| Ask any level designer what
the most time consuming part of level design is, and they
will most likely answer: lighting. The fact is, lighting isn't
that difficult in implementation, but rather in choices of
lighting, and the amount of options available. We'll try to
break down the choices here.
Lights, since they are just
point entities with working defaults, are among the easiest
entities to add, but the actual method varies from editor
to editor, so check the docs for yours.
Now, on to the good stuff.
Here are the flags and fields, and their uses:
LIGHT
This is the
brightness of the light. Default is 300. The fall-off
distance of the light is proportional (the brighter the
light, the further it shines.)
In order to
change the light value, simply add a key of "light"
with the desired keyvalue.
One thing
worthy of mention. Light entities differ from lit surfaces,
in that the amount of light that a surface emits is dependent
on the size of the face, whereas two light entities
with the same "light" keyvalue will always emit
the same amount of light, regardless of color.
(which is why software Q2 always looks so bright)
_COLOR
(Note,
a value prefixed with an underscore (_) means that the
key will be ignored if the default is not applicable.
This is why "color" works here as well. It's
good practice to always include the underscore, even if
it works without it.)
This is the
color that the light entity will emit. The actual color
is determined by a set of three numbers between 0 and
1, representing red, green, and blue, respectively. The
_color values are proportional, meaning that a value of
"0.1 0.1 0.1" would give you exactly the
same thing as "1 1 1", and "0.5
1 1" would give you the same as "0.25 0.5
0.5"
Example:
"_color" "0 0 1"
would emit blue light in gl
"_color" "1 1 1"
would emit white light in gl
"_color" "0.5 0.5 0.5"
would emit white in gl.
"color" "1 0 0" would
emit red light in gl, but kick out a "color
is not a field" warning in software. (moral:
use the underscore)
The color
room in the [example
.map] demonstrates
mixing of colors, as well as how bad too much color can
look.
STYLE
The style
key determines whether or not the light will be a dynamic
light, and if so what pattern it will follow. The default
is 0 (static).
Here are the
values, and their patterns. 'a' represents total darkness,
and 'z' represents double brightness. 'm' is normal brightness
(nabbed from the gamex86 source):
- FLICKER (first variety)
"mmnmmommommnonmmonqnmmo"
- SLOW STRONG PULSE
"abcdefghijklmnopqrstuvwxyzyxwvutsrqponmlkjihgfedcba"
- CANDLE (first variety)
"mmmmmaaaaammmmmaaaaaabcdefgabcdefg"
- FAST STROBE
"mamamamamama"
- GENTLE PULSE 1
"jklmnopqrstuvwxyzyxwvutsrqponmlkj"
- FLICKER (second variety)
"nmonqnmomnmomomno"
- CANDLE (second variety)
"mmmaaaabcdefgmmmmaaaammmaamm"
- CANDLE (third variety)
"mmmaaammmaaammmabcdefaaaammmmabcdefmmmaaaa"
- SLOW STROBE (fourth
variety)
"aaaaaaaazzzzzzzz"
- FLUORESCENT FLICKER
"mmamammmmammamamaaamammma"
- SLOW PULSE NOT FADE
TO BLACK
"abcdefghijklmnopqrrqponmlkjihgfedcba"
12-31 open for modification
32-62 reserved by QRAD3
for switchable light styles, and 63 is reserved for testing
In order to make a dynamic
light, simply add a key of "style" and the appropriate
value. (ex: "style" "5" will make
a pulsing light.)
INFO_NOTNULL
- a target_laser
will only shoot in a horizontal or vertical direction.
However, if you want a laser to shoot in other directions
then you're going to have to have it shoot at a target.
This target must be an info_notnull.
- this is where the turret_breach will be aimed at. (See
turret).
- but, it can also be used as a teleporter_destination.
Instead of using the destination entity you can just use
this Info_notnull. The advantage is that the player will
no longer be teleported onto that little destination platform,
but can now be teleported into mid-air:)
TARGET/INFO_NULL/SPOTLIGHTS
A light entity
can only target one thing: an info_null. What happens
when you target an info_null? a spot light happens. (woo)
Personally, I dig spotlights, and use them a lot. Here's
how you do it.
Create a light.
Give it a "target" key, and a keyvalue (we'll
use "spot1".) Create an info_null at
the place at which you want the spotlight to point.
Give the info_null a "targetname" key, and keyvalue
(again, "spot1".)
Now, what
if you want a wider spotlight? Well, that's why we have...
_CONE
The default
_cone value is 10. The higher the value, the wider the
spot. To use it, add the "cone" key,
and the desired value to the light entity.
Switchable
lights
Let's say
we wan't a light to be turned on or off by some other
event (be it a button, trigger, etc..) What we need to
do in this case, is to set up the triggering event (in
this case, a func_button,) and give it
a "target" (we'll use "lt1".)
Now, we need to create a light, and give it a "targetname"
of "lt1". We now have a light
that turns off when we hit the button. If you would like
the light to turn on when you hit the button, set the
start_off spawnflag for the light.
func_timer
Now we'll move
on to the func_timer entity, and how we
can use it to create a blinking light that looks a bit more
random than the predefined styles.
What exactly
is it and what does it do? A func_timer
is just that. A timer. When the time is up, the timer triggers
all of its targets, and then starts over. This has a wide
range of uses, such as a door that opens 30 seconds after
another door, or a light that turns on 2 minutes after you
enter a level. I this case, we're going to use it for a
flickering light that starts on, and starts flickering when
we approach it.
First thing
we need to do is add a light. Give the light a "targetname"
(we'll use "flic".) Now create
a func_timer, and give it a "target"
key with the value "flic". We
want the light to turn off and on every half second, so
we'll use the "wait" key, and
give it a value of "0.5". Now,
since we wan't it to look like a random flashing light,
we'll use a key that's pretty damn neat. The "random"
key. Give it a value of "0.3".
This means that the light will toggle every .5 seconds,
+/- .3 seconds. So the flashing will vary from .2 seconds
to .8 seconds.
Now, let's say
we want the light to start flickering 1 second after the
timer is triggered. Why? because I only have two keys, and
one spawnflag left to explain on this one, and this is one
of them. What we need to do here is make a key called "delay"
and give it a value of "1".
Now create a
trigger_once,
and target it at the func_timer.
If we wanted
the timer to start as we entered the level, we would set
the "start_on" spawnflag.
The last key
for func_timer is "pausetime".
Pausetime is the amount of time, in seconds,
that the timer will wait before the first time it starts.
pausetime needs start_on
to be set. If you have a "delay"
of "10", and a "pausetime"
of "20", the timer will fire
30 seconds after you begin the level. If it's turned off
after that, and turned back on, it will wait 10 seconds.
light_mine1
and light_mine2
These 2 entities are simply predefined lights that are
the lights that were used on the mine levels in quake2.
They act like normal lights they just have a predefined
shape. Here are pics of them.
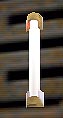 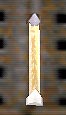
NOTE: If you want to rotate a light_mine (1 or 2)
you have to give it an "angle" key.
_minlight
_minlight is a very strange key value pair that
can be used with certain entities like func_door, func_button,
func_rotating, etc, etc. Basically any visual entity except
the item entities. What it does is makes the object glow.
Lets say you have a very dark room and there is a button
the player has to press but it is so dark that the player
is not going to be able to find it. Well, this is where
_minlight can come in very handy. Select the func_button
entity and give it a key value pair of _minlight and a value
of 1. This will make the func_button glow a faint white
so it will be more visible.
The glow from _minlight does not make the surronding area
any brighter, just the object that has the _minlight value.
The values for _minlight should be between 0 and 2. I have
not noticed any difference with exteremly high values. 2
seems to be the max.
-GrrandMaMa
You can download the [example
.map] here. Also
if you have any problems or need some help please post to
the discussion board.
Return
to Tutorials Page...
|